SUP Pump Won’t Build Pressure — Here’s the Fix
SUP pump troubleshooting has gotten complicated with all the bad advice flying around. And honestly, most of it skips the one fix that actually works. I’ve owned four inflatable SUPs over the past six years — killed one pump through pure ignorance — and I’ve stood in a parking lot at 6 a.m. with a half-inflated board and burning arms, gauge pinned at zero, pumping like an absolute maniac. Accomplished nothing. After working through every pressure problem you’re realistically going to hit, I put this together. Covers both manual and electric pumps. And I’m leading with the fix that solves most failures immediately.
This article includes affiliate links. We may earn a commission at no extra cost to you.
Probably should have opened with this section, honestly — but more on that in a second.
Manual Pump Won’t Build Pressure — Add Lubricant
This is the fix. If your manual pump pushes air with zero resistance and the board just sits there — stop. Lubricate the internal cylinder before you do anything else. This single step resolves roughly 80% of manual SUP pump pressure failures. Almost nobody leads with it.
Here’s what’s actually happening: inside your pump barrel, a rubber piston creates a seal against the cylinder wall. Over time — especially after a dry winter in a garage — that rubber loses its grip. Air blows right past it. You’re working hard and moving air directly into the atmosphere, not into your board.
The fix takes about four minutes.
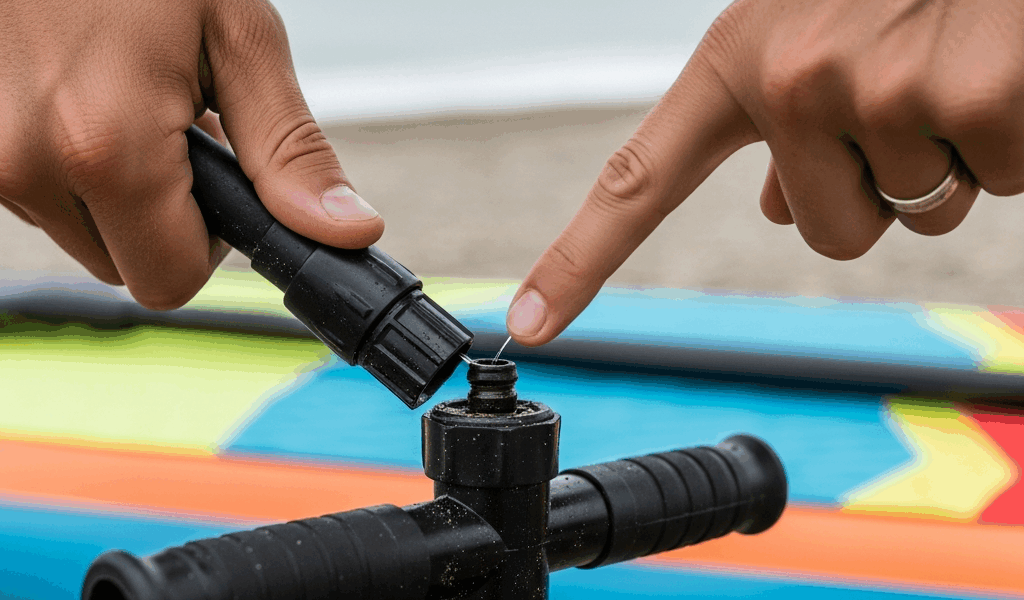
- Unscrew the top cap of your pump handle assembly. On most pumps — including the Bravo HP2 and the iRocker dual-action — this is a large plastic collar that threads counterclockwise.
- Pull the piston rod straight up and out of the cylinder.
- Find the rubber piston head at the bottom of the rod. Looks like a thick rubber disc or cup.
- Apply a generous coat of petroleum jelly (Vaseline, about $3 at any pharmacy) or silicone-based lubricant to the outer edge of that rubber disc. Silicone spray works. Red-N-Tacky silicone grease or plain white lithium grease are both fine. Do not use WD-40 — it degrades rubber over time.
- Slide the piston back into the cylinder, reassemble the cap, and pump.
The difference is immediate and obvious. That heavy, satisfying resistance on the downstroke comes back instantly. The board firms up. Done.
Don’t make my mistake. I bought a completely new pump before figuring this out — $38 at my local paddle shop, used it twice — then discovered the original just needed a two-minute Vaseline treatment. Annoying doesn’t really cover it.
If lubricating the piston helps but the pump still loses pressure between strokes, check the hose fitting at the board valve end. Make sure it’s fully seated and locked. A half-connected Halkey-Roberts adapter is a surprisingly common culprit.
Switch from Dual-Action to Single-Action Mode
Manual SUP pumps have two operating modes. Most beginners have no idea this exists — and if nobody told you, you’ve been making your life significantly harder than it needs to be.
Dual-action mode pumps air on both the downstroke and the upstroke. Extremely efficient at low pressures. Great for getting a board from 0 to around 5 PSI quickly. But around 5 to 6 PSI, the upstroke becomes brutal — you’re fighting the board’s internal pressure on every pull. A lot of people interpret this as the pump failing. It’s not failing. It’s working correctly. It’s just time to switch modes.
Single-action mode pumps only on the downstroke — a mechanically stronger motion. Slower per stroke, but actually manageable at higher pressures. Most SUPs need 12 to 15 PSI. You’re not getting there in dual-action without either giving up or straining something.
How to Switch Modes
Look at the base of your pump barrel or the handle assembly. There’s usually a small valve, a twist collar, or a pin you pull out and rotate 90 degrees. On the Red Paddle Co pump and most generic dual-action pumps, it’s a small knob at the bottom of the cylinder. On the iRocker, there’s a switch on the handle shaft itself.
- Inflate in dual-action mode until the board is roughly shaped — around 4 to 5 PSI
- Switch to single-action mode
- Finish inflating to your target pressure, typically 12 to 15 PSI depending on your board
This workflow is dramatically easier than brute-forcing your way to full pressure in dual-action the entire time. Once I started doing it this way, my inflation time dropped and I genuinely stopped dreading the process.
Your Gauge Won’t Register Until 7–8 PSI
This one causes a lot of unnecessary panic. You’re pumping, the board is getting firmer, the gauge is sitting at zero — and you start wondering if something’s broken or leaking. Nine times out of ten, nothing is wrong.
But what is actually happening here? In essence, it’s a mechanical threshold issue. Standard analog pressure gauges — the dial type built into most SUP pumps — physically cannot display pressure below 7 to 8 PSI. The spring inside the gauge requires a minimum pressure before the needle moves at all. Below that threshold, the needle stays pinned at zero regardless of what’s actually happening inside the board. But it’s more than just a quirk — misreading it can send you chasing a problem that doesn’t exist.
So when the gauge reads nothing during early inflation, that’s expected. Keep pumping. The needle jumps to life around 7 to 8 PSI and behaves normally from there.
If the gauge still reads zero after the board feels genuinely rigid — can’t dent it with your palm — then you may have an actual gauge problem. A separate pressure gauge will confirm it. The Acu-Rite digital tire gauge works on most SUP valves and runs about $12 on Amazon. Worth having as a backup anyway.
One scenario where a stuck gauge does indicate a real problem: if you inflate past what feels like a reasonable pressure and the needle never moves, but the board sounds like it’s losing air — check your valve first. A Halkey-Roberts valve stuck in the open position will let air out as fast as you put it in.
Electric SUP Pump Troubleshooting
Electric pumps fail differently than manual ones. The causes are more specific — and a few are genuinely easy to fix without replacing anything.
Power and Connection Problems
Start with the 12V car adapter connection. Electric SUP pumps — the Seamax SUP-V1, the OutdoorMaster Shark II, the iRocker electric pump — all run off a 12V DC connection into a car’s cigarette lighter port. That connection is the first thing to check.
- Inspect the 12V plug for debris — sand and grit collect in car lighter ports and block the connection entirely
- Check the fuse inside the 12V plug. There’s a small removable cap at the tip of most plugs with a 15-amp or 20-amp fuse inside. A blown fuse means the pump appears completely dead. Replacement fuses run about $2 at any auto parts store
- Try a different 12V outlet if your vehicle has more than one — some rear outlets run on separate fuse circuits
Valve Adapter Compatibility
Electric pumps come with multiple adapter tips, and using the wrong one is more common than you’d think. The three main SUP valve types are the Halkey-Roberts (most common on modern boards), the Boston valve (older boards and some budget brands), and the H3 screw-pin style. Using an adapter that doesn’t fully seat creates an air leak — the pump runs fine, it’s just venting air around a loose fit, which makes it appear unable to build pressure.
Match your adapter to the valve, press it fully until it clicks or locks, and test again before assuming the pump is faulty.
Overheating and Thermal Shutoff
Frustrated by what seemed like a completely dead pump, a paddler in our local SUP group discovered her Shark II was shutting off due to thermal protection — a safety feature built into most electric pump motors. That’s what makes electric pumps endearing to us paddlers in theory — they’re smart enough not to destroy themselves. In practice, it mostly just causes confusion.
Electric SUP pumps aren’t designed for back-to-back multi-board sessions without breaks. Inflate one board, immediately start on a second without letting the motor cool, and thermal shutoff kicks in. The pump isn’t broken. It’s protecting itself.
- Let the pump rest 15 to 20 minutes between boards
- Make sure the pump’s ventilation slots aren’t blocked — don’t set it on a towel or in sand where the vents get covered
- If it shuts off mid-inflation on a single board within the first two minutes, that’s a different problem — see the next section
Pump Runs but Won’t Reach Target Pressure
If the pump runs, air is moving, but it tops out 3 to 4 PSI below your target setting — check two things. First, verify the valve adapter isn’t leaking. Press it harder or swap in a different adapter tip. Second, check your hose for cracks along its length. A small crack can bleed just enough pressure to prevent the pump from reaching higher PSI ranges, even if it builds fine in the lower range.
When to Replace Your Pump
Not every pump problem has a $3 fix. Here’s how to know when you’re past the repair threshold.
Manual Pumps
If lubricating the piston doesn’t restore pressure, pull it out and inspect the rubber piston head closely. Look for cracks, tears, or sections where the rubber has gone hard and lost flexibility. A cracked O-ring or piston seal is the next failure point after lubrication issues.
Replacement O-rings and piston seals for most standard SUP pumps run $3 to $5 online — search your pump model plus “piston seal” or “O-ring kit.” Red Paddle Co, Bravo, and iRocker all sell replacement parts directly. Worth attempting before buying a new pump.
If the piston seal looks fine, the cylinder wall itself may be scratched or warped. At that point, replacement makes more sense. A solid manual dual-action SUP pump runs $25 to $40 — the Bravo HP2 at around $35 is a reliable workhorse, and the Seamax double-action at $28 holds up well.
Electric Pumps
The clearest sign of internal failure in an electric pump: thermal shutoff triggering within two minutes of starting, consistently, on a cool motor. That points to either a failing motor drawing too much current or a damaged thermal fuse triggering prematurely. Neither is a home repair.
Electric SUP pumps generally run $80 to $180. While you won’t need a professional repair shop, you will need either a warranty claim or a replacement unit. If the pump is under warranty — most carry a one-year warranty — contact the manufacturer before spending anything. Outdoor Master and Seamax both have responsive support and will often replace a faulty unit without requiring you to ship the old one back.
Outside of warranty, the math is straightforward: if a pump is more than two years old and showing internal failure symptoms, replacement is the right call. Repair costs on an electric motor typically exceed the cost of the pump itself.
One last thing — most pump failures, manual or electric, happen in the first or second season of use. Not because the pumps are poorly made, but because they get stored wet, left in hot cars, or run without lubrication. Dry storage, occasional lubrication on manual pumps, vent-clearing on electric ones. Five minutes of basic maintenance. It’s apparently all it takes — and it’s saved me real money.

Stay in the loop
Get the latest paddleboard spots updates delivered to your inbox.