How to Tell Where the Water Is Coming From
Paddle board repairs have gotten complicated with all the conflicting advice flying around. As someone who spent an entire afternoon patching the wrong board entirely, I learned everything there is to know about diagnosing water intrusion the frustrating way. Today, I will share it all with you.
A board takes on water for one of two reasons. Either the inflatable’s valve or seam is leaking — or a hard board has cracked through its outer skin and the foam core underneath is quietly soaking up water. The fixes are completely different. Misdiagnosing which problem you have means buying the wrong kit, doing the wrong repair, and standing at the water’s edge wondering why nothing worked.
Here’s what to check right now:
- Feel for soft spots. Press your palm across the entire deck and rails. A squishy area that doesn’t spring back means water is already trapped inside the foam core — and that’s a hard board problem, not an inflatable one.
- Look for bubbling or wrinkles. On inflatables, delamination shows up as a bumpy, textured patch where the outer layer has pulled away from internal seams. You’ll know it when you see it.
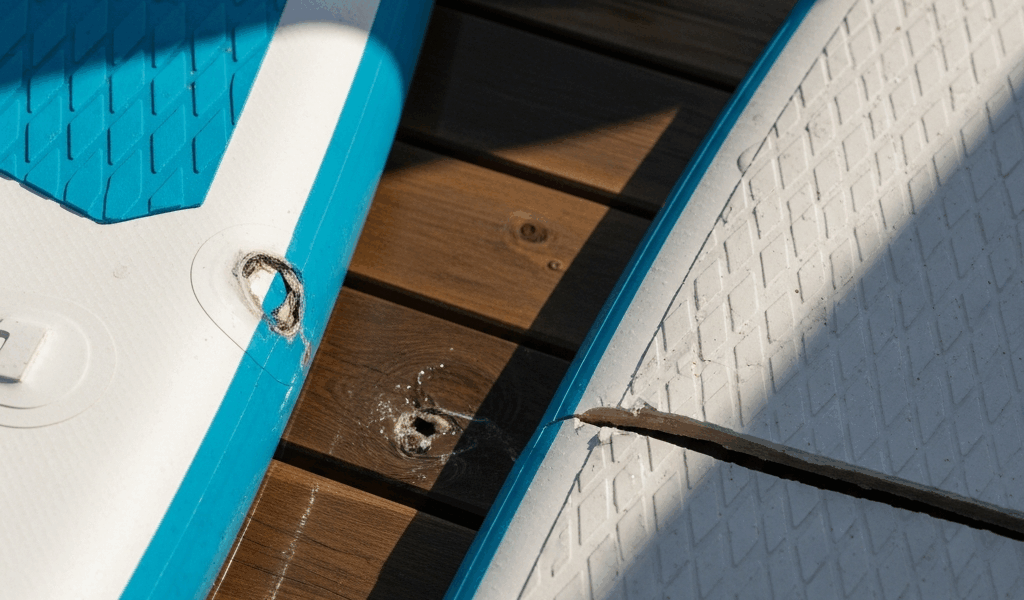
- Inspect the valve first.** Probably should have opened with this section, honestly. Unscrew the valve cap and look inside. A loose or corroded valve stem is the most common culprit by a wide margin — and a $12 valve wrench fixes it in five minutes. I’ve watched people replace entire boards when that was all it took. Don’t make my mistake.
- Check for visible cracks or dents. Hard boards don’t hide damage well. Look along the deck pad and rails for stress fractures, impact dings, or splintered fiberglass. A crack you can see is almost always where the water is getting in.
That’s what makes proper diagnosis so valuable to us paddlers — once you know your board type and where the damage actually is, the repair path becomes obvious. So, without further ado, let’s dive in.
Fixing a Leaking Valve on an Inflatable Board
Start here. Always start here. A loose valve causes more water intrusion than any other single issue on inflatable paddleboards, and the fix takes about five minutes once you have the right tool.
While you won’t need a full workshop setup, you will need a handful of basic supplies. A valve wrench runs $8 to $15 — brands like Bravo and Tower both include one in their repair kits, so check your accessory bag before buying. Unscrew the valve cap completely, place the wrench over the valve stem, and turn clockwise slowly. Tighten until you feel resistance. Stop there. Over-tightening cracks the rubber seal inside — which defeats the entire purpose of this exercise.
Once tightened, test it. Mix one teaspoon of dish soap per cup of water, dip a sponge into the mixture, and wipe it generously over the valve housing and the two inches of board surface surrounding it. Watch for bubbles. Expanding bubbles mean it’s still leaking. Nothing after 30 seconds means the tightening worked.
If the soap test still shows bubbles, the valve seal itself is damaged. You’ll need to replace the whole valve — most inflatable boards run on either Halkey-Roberts or Boston Valve systems, and replacement kits cost $15 to $35 depending on brand. Remove the old valve counterclockwise with the wrench, thread the new one in hand-tight, apply a small amount of silicone sealant around the base threads, and leave it alone for 24 hours before you inflate again. I’m apparently impatient by nature, and skipping that cure time never works for me while waiting always does. Learn from that.
Patching a Seam or Pinhole on an Inflatable Board
Valve is tight, soap test came up clean around the housing, but water’s still getting in. That means a seam leak or a small puncture somewhere on the board surface itself.
Finding the exact spot requires either submersion or a full soap-water sweep — depending on your board’s size. Smaller boards: partially inflate until firm but still flexible, then submerge sections in a bathtub or shallow pool and watch for air bubbles rising from the surface. Mark every leak site immediately with a waterproof marker. Larger boards are harder to submerge, so apply the soapy water mixture across every seam and inch of surface instead, paying extra attention to the rails.
Once you’ve found it, dry the board completely. This is non-negotiable — a wet surface ruins patch adhesion, full stop. Clean cloth first, then at least two hours of air-drying. A hair dryer on low heat speeds things up if you’re pressed for time.
Most boards ship with a patch kit tucked into the accessory bag. If yours didn’t, a Sealing Max or Aqua-Bound repair kit runs $12 to $20 and includes patches, sandpaper, and adhesive. Sand lightly around the leak to rough up the surface, apply a thin even coat of adhesive, press the patch firmly over the hole, and hold it for 30 to 60 seconds. Then leave it alone — 12 to 24 hours of cure time before the board goes anywhere near water.
Common mistake: patching a damp surface because waiting feels ridiculous. The patch won’t bond. You’ll be doing this exact repair again in a week. And if you’re patching the same spot a second time, that section’s structural integrity is already compromised — at that point, replacement is probably the smarter call.
What to Do If Your Hard Board Is Taking On Water
Frustrated by a mysterious spongy deck after a rocky launch, many paddlers grab filler and start patching immediately — using leftover resin, wrong-grade sandpaper, and no plan whatsoever. That approach fails almost every time. This is how to actually do it.
But what is hard board water intrusion, exactly? In essence, it’s a crack or ding that has broken through the fiberglass skin and resin layer, exposing the foam core to open water. But it’s much more than that — once water reaches the foam, it spreads, adding weight and degrading the resin bond holding the whole structure together.
Before touching any repair material, check whether the core is already wet. Press the soft area firmly. Squishy feel, no rebound after a few seconds — water is inside. You cannot patch over a wet core. The repair fails within weeks, guaranteed.
Drying a saturated core takes three to five days in direct sunlight, turning the board periodically so every surface gets exposure. Some repair guides recommend drilling small weep holes through the deck pad to let trapped moisture escape — then sealing them later. That accelerates the drying process by roughly 48 hours. Worth doing if you’re impatient.
Once dry, clear out any loose foam or fiberglass debris with a small brush or a shot of compressed air. System Three and West Marine both make paddleboard-specific epoxy resin fillers — apply directly into the void, smooth level with a putty knife, and sand flush after the 24-hour cure. Finish with a UV-resistant topcoat to seal everything against future exposure.
Severe delamination — where the fiberglass skin has separated from the core across a large area — is a different conversation entirely. A board that’s lost structural integrity over multiple feet is a safety risk. Small dings and cracks are absolutely fixable. Multi-foot separation means replacing the board is the smarter choice, honestly.
How to Stop It Happening Again
Rinse with fresh water after every single session — especially after salt water. Salt accelerates seal degradation faster than most people expect. Dry the board completely before it goes into storage. For inflatables, that means a cool location away from direct sunlight, since UV exposure stresses both seams and valve rubber over time. Deflate slightly before storing too. A fully pressurized board sitting under heat stress develops micro-tears that are invisible until they’re not.
Hard boards need regular deck pad and rail inspections. Small cracks spread quickly once they start. Catch them early. Store boards upright or on a padded rack — not flat on the ground for months at a stretch, which warps the structure in ways that are genuinely difficult to reverse.


Stay in the loop
Get the latest paddleboard spots updates delivered to your inbox.